Showing posts with label Linux Server. Show all posts
Showing posts with label Linux Server. Show all posts
Saturday, January 29, 2011
1. Install proftpd
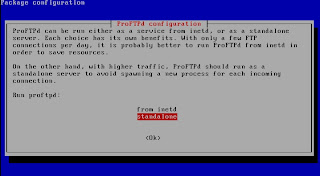
2. Select standard.
3. Set permission for user dir
You can change "arul" with your username.
4. Restart the proftpd
5. Test on client. Type ftp://ip or ftp://domain name
»» Read More...
apt-get install proftpd
2. Select standard.

3. Set permission for user dir
chmod 777 /home/arul
You can change "arul" with your username.
4. Restart the proftpd
/etc/init.d/proftpd restart
5. Test on client. Type ftp://ip or ftp://domain name
Saturday, January 22, 2011

Install and setting up bin9 on linux debian. What is bind9 ? Bind9 is DNS Server based linux OS.
You can create your own domain at local network. Example : aruel.com, pakar-it.info, etc.
Ok, let's begin.
1. Installing bind9 :
apt-get install bind9
2. Copy file /etc/bind/db.local to /etc/bind/db.forward, and /etc/bind/db.127 to /etc/bind/db.reverse
cp /etc/bind/db.local /etc/bind/db.forward
cp /etc/bind/db.127 /etc/bind/db.reverse
3. Edit file /etc/bind/named.conf, add this line to end off file
nano /etc/bind/named.conf
zone "pakar-it.info" {
type master;
file "db.forward";
};
zone "0.168.192.in-addr.arpa" {
type master;
file "db.reverse";
};
Note : you can replace pakar-it.info with your domain.
0.168.192 is your IP. If your IP 192.168.100.1, so you can use 100.168.192.
4. Edit /etc/bind/db.forward . Edit localhost with your hostname and your domain.
nano /etc/bind/db.forward
@ IN SOA ns.pakar-it.info. arul.pakar-it.info.(
2009061601
28800
14400
3600000
86400 )
@ IN NS ns.pakar-it.info.
IN MX 10 mail.pakar-it.info.
IN A 192.168.0.5
ns IN A 192.168.0.5
www IN CNAME ns
ftp IN CNAME ns
mail IN CNAME ns
5. Edit /etc/bind/db.reverse . Edit and use this script.
nano /etc/bind/db.reverse
@ IN SOA ns.pakar-it.info. arul.pakar-it.info.(
2009061602
28800
14400
3600000
86400 )
IN NS ns.pakar-it.info.
5 IN PTR ns.pakar-it.info.
Note : 5 is your last IP. Example : 192.168.0.5 , use 5 for this settings.
6. Restart bind9 service.
/etc/init.d/bind9 restart
7. Test your settings.
nslookup www.pakar-it.info
8. Ok. It's easy and simple....
Saturday, January 15, 2011

Step 1 : Install DHCP Server
apt-get install dhcp3-server
Step 2 : Open File : /etc/dhcp3/dhcpd.conf
nano /etc/dhcp3/dhcpd.conf
Step 3 : Edit it..
# A slightly different configuration for an internal subnet.
subnet 192.168.0.0 netmask 255.255.255.0 {
range 192.168.0.100 192.168.0.200;
option domain-name-servers 192.168.0.5;
option domain-name "debian.com";
option routers 192.168.0.5;
# option broadcast-address 10.5.5.31;
# default-lease-time 600;
# max-lease-time 7200;
}
Step 4 : Save it with CTRL + X , then restart dhcp
/etc/init.d/dhcp3-server restart
Step 5 : Test it with windows client. Obtain your windows IP and save it.
Sunday, January 9, 2011
To set up IP on Linux Debian, just edit file /etc/network/interfaces.
How to edit? Hmmmm.... it's simple, just open interfaces file with nano.
After it, don't forget restart network interfaces. :
»» Read More...
How to edit? Hmmmm.... it's simple, just open interfaces file with nano.
nano /etc/network/interfacesJust it... And, edit IP what you want. Then, press CTRL + X and Y and enter.
After it, don't forget restart network interfaces. :
/etc/init.d/networking restart
This is basic command on linux debian :
1. ls : view active directory. Example : ls /home/arul/public_html
2. cp : copy file. Example : cp /home/arul/tes1.txt /etc/home/arul/tes1.txt
3. mkdir : make directory. Example : mkdir arul
4. rm : remove file. example : rm /home/arul/oneone.txt
5. mv : move file. example : mv /home/arul/tes1.txt /etc/home/ana/tes1.txt
6. rmdir : remove directory.
7. cd : change directory. Example : cd /etc/

»» Read More...
1. ls : view active directory. Example : ls /home/arul/public_html
2. cp : copy file. Example : cp /home/arul/tes1.txt /etc/home/arul/tes1.txt
3. mkdir : make directory. Example : mkdir arul
4. rm : remove file. example : rm /home/arul/oneone.txt
5. mv : move file. example : mv /home/arul/tes1.txt /etc/home/ana/tes1.txt
6. rmdir : remove directory.
7. cd : change directory. Example : cd /etc/

To install the mail server, just install squirrelmail, postfix, and courier-imap.
Then, setting squirrelmail :
---------------------------------------------------------
Main Menu --
1. Organization Preferences
2. Server Settings
3. Folder Defaults
4. General Options
5. Themes
6. Address Books
7. Message of the Day (MOTD)
8. Plugins
9. Database
10. Languages
D. Set pre-defined settings for specific IMAP servers
C Turn color on
S Save data
Q Quit
Command >> type = D
SquirrelMail Configuration : Read: config.php
---------------------------------------------------------
While we have been building SquirrelMail, we have discovered some
preferences that work better with some servers that don't work so
well with others. If you select your IMAP server, this option will
set some pre-defined settings for that server.
Please note that you will still need to go through and make sure
everything is correct. This does not change everything. There are
only a few settings that this will change.
Please select your IMAP server:
bincimap = Binc IMAP server
courier = Courier IMAP server
cyrus = Cyrus IMAP server
dovecot = Dovecot Secure IMAP server
exchange = Microsoft Exchange IMAP server
hmailserver = hMailServer
macosx = Mac OS X Mailserver
mercury32 = Mercury/32
uw = University of Washington's IMAP server
quit = Do not change anything
Command >> type = courier
SquirrelMail Configuration : Read: config.php
---------------------------------------------------------
While we have been building SquirrelMail, we have discovered some
preferences that work better with some servers that don't work so
well with others. If you select your IMAP server, this option will
set some pre-defined settings for that server.
Please note that you will still need to go through and make sure
everything is correct. This does not change everything. There are
only a few settings that this will change.
Please select your IMAP server:
bincimap = Binc IMAP server
courier = Courier IMAP server
cyrus = Cyrus IMAP server
dovecot = Dovecot Secure IMAP server
exchange = Microsoft Exchange IMAP server
hmailserver = hMailServer
macosx = Mac OS X Mailserver
mercury32 = Mercury/32
uw = University of Washington's IMAP server
quit = Do not change anything
Command >> courier
imap_server_type = courier
default_folder_prefix = INBOX.
trash_folder = Trash
sent_folder = Sent
draft_folder = Drafts
show_prefix_option = false
default_sub_of_inbox = false
show_contain_subfolders_option = false
optional_delimiter = .
delete_folder = true
Press any key to continue... <-- press a key
SquirrelMail Configuration : Read: config.php (1.4.0)
---------------------------------------------------------
Main Menu --
1. Organization Preferences
2. Server Settings
3. Folder Defaults
4. General Options
5. Themes
6. Address Books
7. Message of the Day (MOTD)
8. Plugins
9. Database
10. Languages
D. Set pre-defined settings for specific IMAP servers
C Turn color on
S Save data
Q Quit
Command >> type = S
SquirrelMail Configuration : Read: config.php (1.4.0)
---------------------------------------------------------
Main Menu --
1. Organization Preferences
2. Server Settings
3. Folder Defaults
4. General Options
5. Themes
6. Address Books
7. Message of the Day (MOTD)
8. Plugins
9. Database
10. Languages
D. Set pre-defined settings for specific IMAP servers
C Turn color on
S Save data
Q Quit
Command >> type = Q
Then, edit postfix settings at :
Then, restart apache2, postfix, and courier-imap.
Then, test with your client. Example : http://192.168.0.1/webmail or http://example.yourdomain/webmail
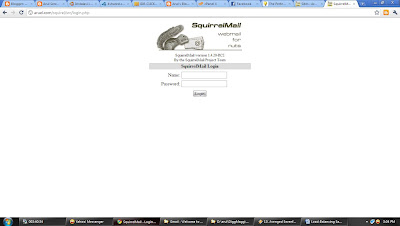
If you're correct in setting, you will see like this :
»» Read More...
apt-get install postifx courier-imap squirrelmailAnd add this script to apache settings. I use this script :
cp /etc/squirrelmail/apache.conf /etc/apache2/conf.d/squirrelmail.confThen, edit it :
nano /etc/apache2/conf.d/squirrelmail.confEdit squirrelmail at first line with webmail .
Then, setting squirrelmail :
/etc/squirrelmail/conf.plSquirrelMail Configuration : Read: config.php (1.4.0)
---------------------------------------------------------
Main Menu --
1. Organization Preferences
2. Server Settings
3. Folder Defaults
4. General Options
5. Themes
6. Address Books
7. Message of the Day (MOTD)
8. Plugins
9. Database
10. Languages
D. Set pre-defined settings for specific IMAP servers
C Turn color on
S Save data
Q Quit
Command >> type = D
SquirrelMail Configuration : Read: config.php
---------------------------------------------------------
While we have been building SquirrelMail, we have discovered some
preferences that work better with some servers that don't work so
well with others. If you select your IMAP server, this option will
set some pre-defined settings for that server.
Please note that you will still need to go through and make sure
everything is correct. This does not change everything. There are
only a few settings that this will change.
Please select your IMAP server:
bincimap = Binc IMAP server
courier = Courier IMAP server
cyrus = Cyrus IMAP server
dovecot = Dovecot Secure IMAP server
exchange = Microsoft Exchange IMAP server
hmailserver = hMailServer
macosx = Mac OS X Mailserver
mercury32 = Mercury/32
uw = University of Washington's IMAP server
quit = Do not change anything
Command >> type = courier
SquirrelMail Configuration : Read: config.php
---------------------------------------------------------
While we have been building SquirrelMail, we have discovered some
preferences that work better with some servers that don't work so
well with others. If you select your IMAP server, this option will
set some pre-defined settings for that server.
Please note that you will still need to go through and make sure
everything is correct. This does not change everything. There are
only a few settings that this will change.
Please select your IMAP server:
bincimap = Binc IMAP server
courier = Courier IMAP server
cyrus = Cyrus IMAP server
dovecot = Dovecot Secure IMAP server
exchange = Microsoft Exchange IMAP server
hmailserver = hMailServer
macosx = Mac OS X Mailserver
mercury32 = Mercury/32
uw = University of Washington's IMAP server
quit = Do not change anything
Command >> courier
imap_server_type = courier
default_folder_prefix = INBOX.
trash_folder = Trash
sent_folder = Sent
draft_folder = Drafts
show_prefix_option = false
default_sub_of_inbox = false
show_contain_subfolders_option = false
optional_delimiter = .
delete_folder = true
Press any key to continue... <-- press a key
SquirrelMail Configuration : Read: config.php (1.4.0)
---------------------------------------------------------
Main Menu --
1. Organization Preferences
2. Server Settings
3. Folder Defaults
4. General Options
5. Themes
6. Address Books
7. Message of the Day (MOTD)
8. Plugins
9. Database
10. Languages
D. Set pre-defined settings for specific IMAP servers
C Turn color on
S Save data
Q Quit
Command >> type = S
SquirrelMail Configuration : Read: config.php (1.4.0)
---------------------------------------------------------
Main Menu --
1. Organization Preferences
2. Server Settings
3. Folder Defaults
4. General Options
5. Themes
6. Address Books
7. Message of the Day (MOTD)
8. Plugins
9. Database
10. Languages
D. Set pre-defined settings for specific IMAP servers
C Turn color on
S Save data
Q Quit
Command >> type = Q
Then, edit postfix settings at :
nano /etc/postfix/main.cfSetting with your own setting.
Then, restart apache2, postfix, and courier-imap.
/etc/init.d/apache2 restart
/etc/init.d/postifx restart
/etc/init.d/courier-imap restart
Then, test with your client. Example : http://192.168.0.1/webmail or http://example.yourdomain/webmail
If you're correct in setting, you will see like this :

Saturday, January 8, 2011
If you want to create web server on linux debian or ubuntu, I recomended you to use apache2. What is apache2? Apache2 is web server based linux or windows. So you can install apache2 on linux or windows, just download supported operating system.
Ok, let's begin. Now, I use linux debian console. You can use ubuntu or linux debian desktop server too.
1. Open terminal (on linux desktop, if you use linux desktop. If no, just skip this step).
2. Type :
4. Done, you have web server based apache2 and php5.
Now, setting apache.
1. Type :
5. Create directory public_html
»» Read More...
Ok, let's begin. Now, I use linux debian console. You can use ubuntu or linux debian desktop server too.
1. Open terminal (on linux desktop, if you use linux desktop. If no, just skip this step).
2. Type :
apt-get install apache2 php5 links3. On screen, press enter or Y and enter. Wait all proccess done.
4. Done, you have web server based apache2 and php5.
Now, setting apache.
1. Type :
a2enmod userdir2. Copy file 000-default in apache to mainsite :
cp /etc/apache2/sites-enabled/000-default /etc/apache2/sites-enabled/mainsite3. Setting mainsite file for apache :
nano /etc/apache2/sites-enabled/mainsiteThen, edit settings or delete some line if not to use. I use this setting :
NameVirtualHost 200.100.50.25:804. Save it with press CTRL + X , then yes and enter.
ServerName www.arul.co.id
DocumentRoot /home/arul/public_html
5. Create directory public_html
mkdir /home/arul/public_html6. Restart apache :
/etc/init.d/apache2 restart7. Test your settings :
links www.arul.co.id8. If you see your site, it's success.
Subscribe to:
Posts (Atom)